-
3-minute read
-
27th May 2020
How to Add Tables in Google Docs
Tables are a great way to present information clearly. But how do you create and edit tables using Google Docs? Here, we’ll look at how to add tables in Google Docs and then how to edit them so they’re clear and easy to read.
How to Add or Delete Tables in Google Docs
Adding a table to your document is easy:
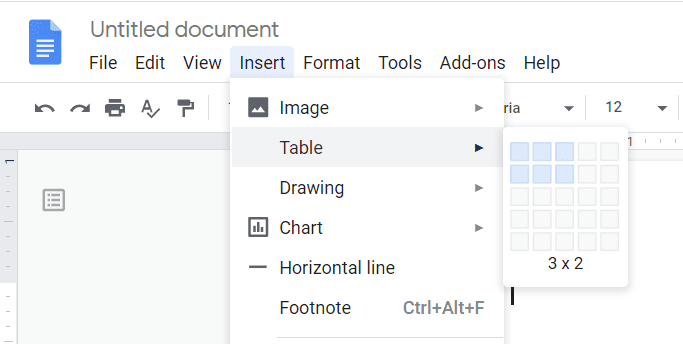
- Go to the Insert menu and select Table.
- Use the grid to select the number of rows and columns to use.
In the image below, we’re inserting a table with three columns and two rows.

If you don’t need the table after all, right click on it and select Delete table.
How to Add or Delete Columns or Rows in a Table
You can also add rows or columns to an existing table. To do this:
- Select a cell in your table.
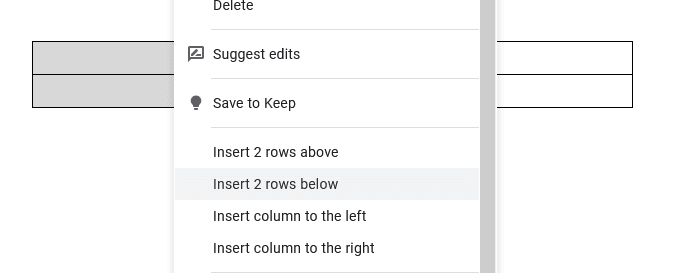
- Right click and select either row or column and a position (e.g. Insert row above or Insert column to the left).
You can also select multiple cells to add multiple rows/columns in one go.

This will add the number of rows/columns selected in the place specified. To delete a row or column, on the other hand, you can simply right click the relevant cell and select Delete row or Delete column as required.
How to Merge Cells
To combine two or more cells within an existing table:
- Select the cells that you want to merge.
- Right click and select Merge cells.
You can undo this by selecting the cell, right clicking, and choosing Unmerge cells. The cells will then return to their original form.
Find this useful?
Subscribe to our newsletter and get writing tips from our editors straight to your inbox.
Subscribe to Beyond the Margins and get your monthly fix of editorial strategy, workflow tips, and real-world examples from content leaders.
How to Resize Rows and Columns
A tidy table will help you to present information clearly. As such, you may need to resize or reformat parts of your table to suit its intended purpose.
The quickest way to resize rows and columns is to click a border of the row/column and drag to resize it. However, this can lead to a table looking untidy, and there are other methods that ensure consistency.
The simplest way to do this is to use the ‘Distribute’ commands:
- Select the columns or rows you want to be the same size.
- Right click and select ‘Distribute rows’ or ‘Distribute columns’ as required.
This will ensure the selected rows/columns are equal in size.
For further formatting options, you will need to adjust the Table Properties.
How to Format and Edit Tables in Google Docs
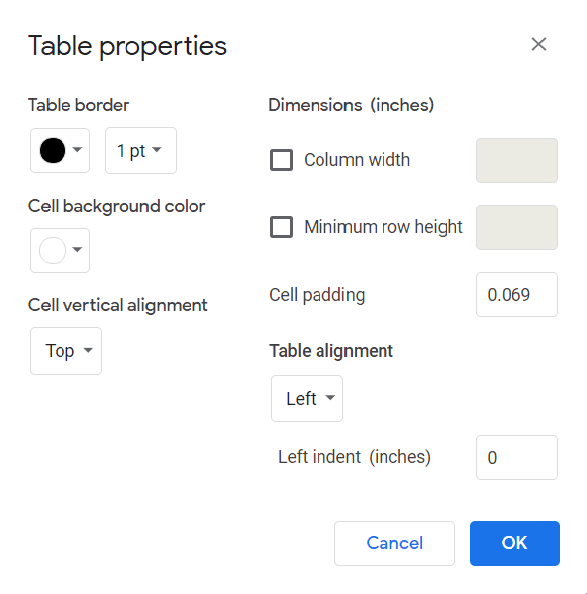
The Table Properties menu will give you extra control over every element of your table. To access this menu, simply:
- Select the cells you want to format.
- Right click the table and select Table Properties.

In the new dialog box that opens, you will then be able to adjust:
- Table borders, including colour and line thickness.
- The background colour and text alignment in cells.
- Column width, row height, and cell padding (i.e. the space between the border of your table and the text inside it).
- Table alignment and indentation (i.e. where the table is on the page).
Hopefully, this guide has helped you to create a well-formatted table. And if you need any help with formatting or proofreading your work, we can help ensure that your tables are perfectly presented and error free.