-
3-minute read
-
7th June 2018
Microsoft Word Tips: Customising the Spellchecker
You should always have your work proofread to make sure it is error free. Nevertheless, Microsoft Word’s automatic proofing options can also help you to avoid mistakes. But to make full use of these features, you need to know about customising the spellchecker in Microsoft Word.
The Microsoft Word Spellchecker
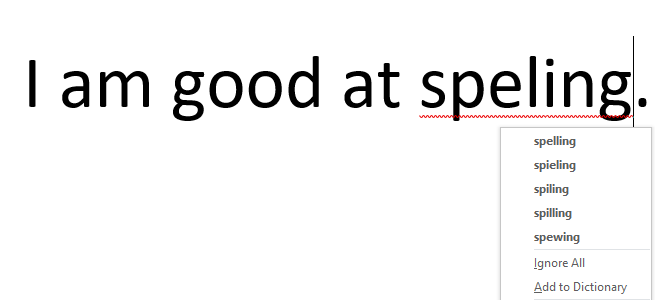
The spellchecker in Microsoft Word works by highlighting words or phrases that it thinks are incorrect. A red wavy line indicates a spelling error; a blue or green line (depending on your version of MS Word) indicates a grammar mistake. For now, though, we will focus on spelling.
If you right click a highlighted term, the spellchecker will usually suggest a correction. Be careful when using this function, though, as Microsoft Word is not always right when it comes to spelling!
You can access the basic spellchecker options in Microsoft Word via File > Options > Proofing on Windows machines, or via Preferences > Spelling & Grammar in Word for Mac.
Selecting a Proofing Language
One important way of customising the spellchecker in Microsoft Word is selecting a proofing language. This controls the default dictionary Word uses for spellchecks. You can use it to select, for instance, Australian English or American English for your document.
On the PC, the proofing language in Microsoft Word can be changed by:
- Going to Review > Language > Proofing Language on the main ribbon
- Selecting your preferred dictionary from the list and clicking OK
The same options can be accessed via Tools > Language in Word for Mac.
Find this useful?
Subscribe to our newsletter and get writing tips from our editors straight to your inbox.
Subscribe to Beyond the Margins and get your monthly fix of editorial strategy, workflow tips, and real-world examples from content leaders.
Customising the Dictionary
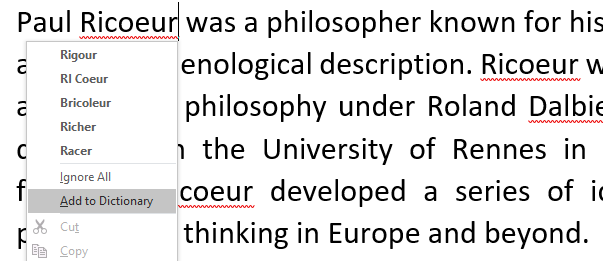
Your ‘custom dictionary’ is unique to your copy of Microsoft Word. This is designed so that you can tell the spellchecker to ignore certain non-standard terms (e.g. surnames or technical language).
You can add terms to this by simply right clicking a word that is underlined in red and selecting Add to Dictionary from the menu. This word will then be recognised as correct in all documents.
Generally, you should only add something to the custom dictionary if you use it a lot or across many documents. For other terms, simply pick the Ignore All option when running a spellcheck. This will remove the highlighting for that term in the document you’re writing, but not in other documents.
Removing Terms from the Custom Dictionary
You can also remove terms from the custom dictionary. This is useful if you accidentally add a word to the dictionary, as the spellchecker will miss it in the future unless you remove it.
You can edit the custom dictionary by:
- Going to File > Options > Proofing (Preferences > Spelling & Grammar in Word for Mac)
- Clicking Custom Dictionaries
- Selecting your chosen custom dictionary (usually CUSTOM.DIC) and clicking Edit Word List
- Adding to or removing terms from the list as required
This menu will also let you import or create custom dictionaries for use in particular documents.