


If you’re working in Microsoft Word and need to begin typing on a new page, you can just hit ‘Enter’ repeatedly until you reach the bottom of the current one. But this can cause text to shift around when making edits later on.
A much better approach is to use page and section breaks, which provide a quick and simple way to start writing on a new page while maintaining tidy formatting in a document.
Page Breaks
A page break is exactly what it sounds like: a break between two pages in a document. To add one in Word 2007 or later, all you need to do is:
- Position your cursor where you want to add a page break
- Go to the ‘Pages’ section in the ‘Insert’ tab on the main ribbon
- Click ‘Page Break’ and begin typing on the new page that appears

Adding a page break.

You can also add a page break by going to the ‘Page Layout’ tab, then selecting ‘Page’ from the dropdown ‘Breaks’ menu. This route also offers additional formatting options, including section breaks, which we’ll look at next.
Section Breaks
Section breaks are similar to page breaks, but they add an invisible divide in a document that allows you to apply different formatting to different sections. This is useful if you want to use distinct page numbering styles or chapter headers in different parts of a document.
Find this useful?
Subscribe to our newsletter and get writing tips from our editors straight to your inbox.
To create a section break between pages, you need to:
- Position the cursor where you need to add a break
- Go to the ‘Page Layout’ tab and open the dropdown ‘Breaks’ menu
- Click ‘Next Page’ under the ‘Section Breaks’ options
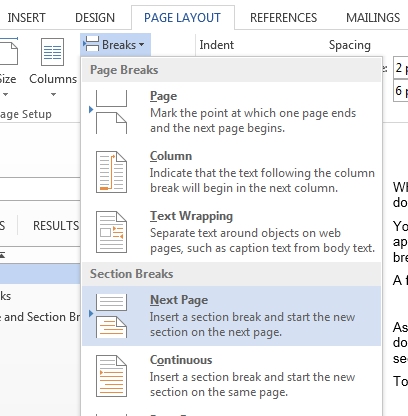
Adding a section break.

If required, you can also add a section break in the middle of a page by selecting the ‘Continuous’ option, but this would be fairly unusual for an academic document.
Editing Page and Section Breaks
Since page and section breaks aren’t usually visible, editing or deleting them can seem tricky. It can also be difficult to edit around them. Luckily, there’s a simple solution:
- Go to the ‘Paragraph’ section of the ‘Home’ tab on the main ribbon
- Click the ‘Show/Hide ¶’ button
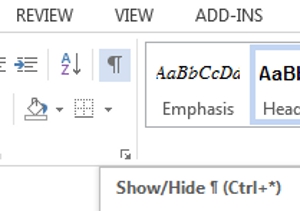
Show/hide formatting.

This symbol (otherwise known as a ‘pilcrow’ or ‘paragraph mark’) reveals hidden formatting in a document. Once you’ve made any required edits, simply click it again to hide them.