


Although Microsoft Word’s spellchecker can never compare to a human proofreader, it is a useful tool for spotting mistakes in your written work. Assuming you know how to use it, that is.
The problem is that there are many varieties of English in the world, as well as a few other languages. As such, you need to make sure your document is using the correct proofing language before running a spellcheck, otherwise it will miss words spelled differently in different regions.
Thus, to make sure you don’t end up with unintentional ‘colors’ or ‘honors’ in your work, you’d better learn how to set the proofing language in Microsoft Word!
Setting the Proofing Language
There are two main ways to set the proofing language of a new document in Microsoft Word. The first is via the ‘Review’ tab on the main ribbon:
- In the ‘Review’ tab, find the ‘Language’ section
- Click on ‘Language’ and select ‘Set Proofing Language…’ from the menu
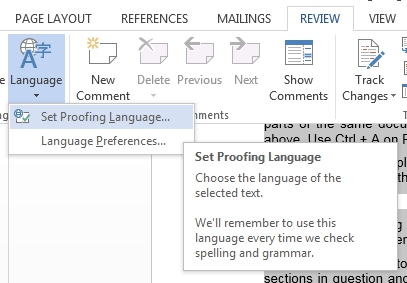
- In the new window, pick a proofing language (e.g. Australian English) and click ‘OK’
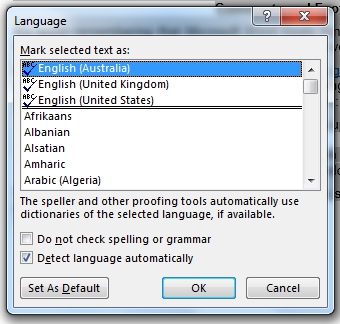


This will set the document to the language chosen. If you click on ‘Set As Default’ in the language window, you can make this the language used for all new documents.
The second approach is largely the same, but involves clicking on the language section of the bar at the bottom of your document.
![]()

This will open up the ‘Languages’ window and allow you to choose a proofing language as described above.
Find this useful?
Subscribe to our newsletter and get writing tips from our editors straight to your inbox.
Applying a New Language to Existing Text
You can specify the proofing language for existing text, or use different languages for different parts of a document, by simply selecting the text in question and repeating the steps above. Use Ctrl + A on PCs, or Cmd + A on Mac computers, to select all text quickly.
Alternatively, you can place the cursor where you want the new language settings to begin and do the same. You can then start typing a new section with new language settings.
Comments and Footnotes
It’s worth remembering that Microsoft Word treats things like headers, footers, comments and footnotes as independent from the main body of your work.
As such, you’ll have to change the proofing language for these separately by selecting the sections in question and changing the language settings as described above.
You can also do this by updating the text ‘Styles’ used in these sections:
- In the ‘Styles’ list, select the style you want to update (e.g. ‘Footnote Text’)
- Right click and select ‘Modify’
- In the new window, click ‘Format’ in the bottom left corner and select ‘Language’

- Pick a new language from the ‘Language’ window, as described above

This is especially important for footnotes and headers, since these need to be consistent with the rest of your document.