


As proofreaders, we’re very keen on the Track Changes function in Microsoft Word.
‘But I’m not a proofreader!’, we hear you cry, ‘Why should I care? Aren’t you supposed to be checking my essay? I’ve got a deadline to meet! AAAAGH! Oh god, oh god, oh god…’
Calm down, dear reader. Here, breathe into this paper bag. Feeling better? Good. We’re always available to lend a hand with spelling and grammar, so there’s no need to panic.
The purpose of this blog post, however, is to demonstrate how using ‘Track Changes’ could help you with editing your own work, which is always the first step in ensuring your academic writing is up to scratch. Let us explain…
What Is Track Changes?
‘Track Changes’ does exactly what the name suggests, in that it helps you keep track of changes to a document by highlighting any edits made since turning on ‘Track Changes’.
As well as allowing you to see the differences between different drafts of an essay, this makes the editing process simpler by letting you quickly revert any changes made if you later decide you preferred the original version.
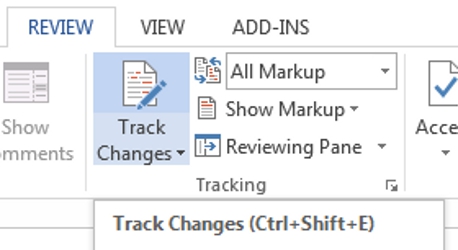
How to Use Track Changes
To turn on ‘Track Changes’ in a Microsoft Word document, all you need to do is go to the ‘Review’ tab on the main ribbon, then click on ‘Track Changes’ in the ‘Tracking’ section.
Find this useful?
Subscribe to our newsletter and get writing tips from our editors straight to your inbox.

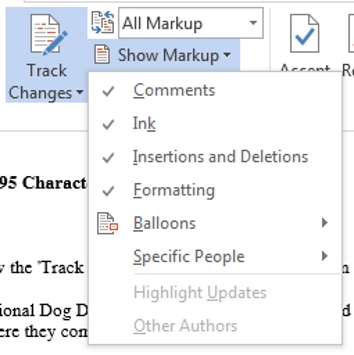
Once you’ve done this, all edits will be recorded. How these changes are displayed depends on the ‘Markup’ options (also in the ‘Tracking’ section of the ‘Review’ panel):
- Simple Markup – Location of edits indicated via red marks at the left hand side of the page on the screen, without showing edits in the main text. Clicking the red marks will switch you to ‘All Markup’ and display the changes.
- All Markup – This makes edits show up in red as part of the main text. Deleted text also shows up in red, indicated using the strikethrough effect (e.g. like this).
- No Markup – See the document in its current state, with no edits displayed.
- Original – See the document as it was before any edits were made.
We recommend using ‘Simple Markup’, as this lets you work unimpeded while still showing where changes have been made. You can also control the type of edits that show up (e.g. changes to the text, but not formatting) via the ‘Show Markup’ menu.

Accepting or Rejecting Changes
Once you’ve finished your revisions, or received your proofread document back from us, you can check the edits by cycling through using the ‘Previous’ and ‘Next’ buttons in the ‘Changes’ section of the ‘Review’ panel.

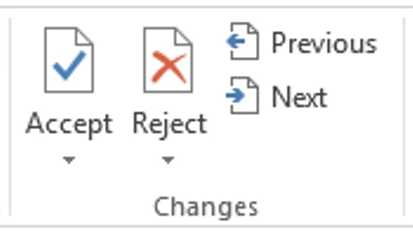
You can accept or reject changes by selecting the relevant text in the document and clicking ‘Accept’ or ‘Reject’ in the same ‘Changes’ section (you can do the same by right clicking and selecting the desired option in the dropdown menu).
You can even accept or reject all changes at once by clicking the little arrow on the ‘Accept’ and ‘Reject’ buttons and selecting the corresponding option from the menu that appears.